docs.unavlab.com
Main ❯ Underwater acoustic modems ❯ uWave: Firmware update guide
ℹ Recommendations for printing / saving as PDF
- Press Ctrl+P (macOS: Cmd+P)
- Select "Save as PDF" (Microsoft Print to PDF) as the printer
- In "Pages", enter a range that excludes the first and the last page
- Disable headers and footers (title, URL, page numbers)
- In Chrome/Edge: More settings → "Margins" → None | in Firefox: "Margins & Header/Footer" → None
- Click Print and choose where to save the PDF
 |
|
|---|---|
| www.unavlab.com support@unavlab.com |
Firmware update guide for uWave modems |
Updating the firmware of uWave modems
We are constantly working to improve our products, taking into account the opinions and wishes of users and eliminating the shortcomings we find. You can find the version history, new features and bug fixes on the page uWave: Version history & changes.
Step 1
Download the necessary utilities.
Step 1.1
Download the demo application uWave Host to work with uWave modems. The application runs on a PC under Windows OS (version 8 or later).
Step 1.2
Download the firmware update utility UCNL_FW_Update. The utility runs on a PC under Windows OS (version 8 or later).
Step 1.3
Simply unpack the downloaded archives into folders of your choice. Neither application requires installation.
Step 2
Prepare everything for connecting the modem to the PC.
Step 2.1
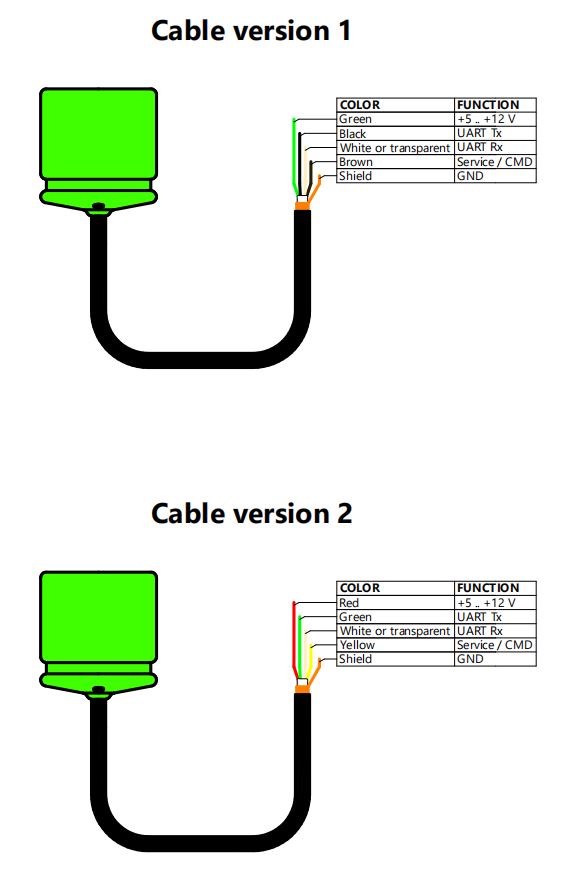
Connect your modem to a UART<->USB converter. The wire assignment by color is shown below:
 |
|---|
| Figure 1. Cable wire assignment |
The voltage on the data lines MUST NOT exceed 3.3 V. To switch the modem to command mode initially, provide a means of pulling the SVC/CMD wire up to a voltage of 3.3 or 5 V. This is conveniently done with a jumper.
Step 2.2
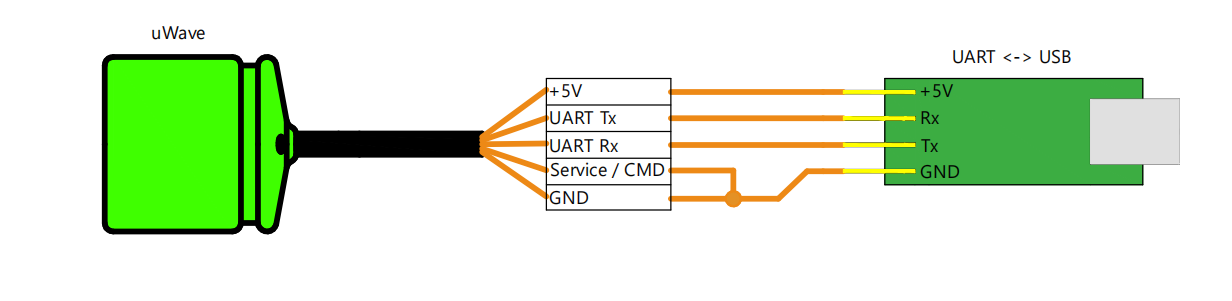
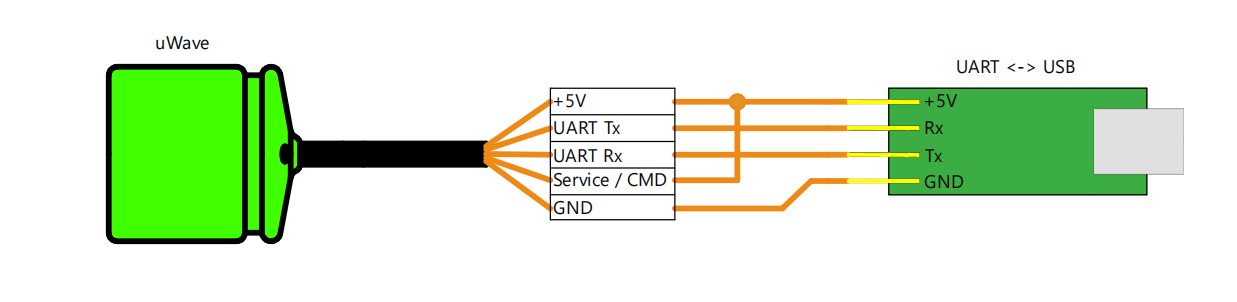
Provide a convenient way of switching the command mode on and off, as shown in the diagrams below.
 |
|---|
| Figure 2. Connecting the modem to the PC USB port using an interface converter. Command mode off |
 |
|---|
| Figure 3. Connecting the modem to the PC USB port using an interface converter. Command mode on |
Step 3
Connect the device to the PC USB port.
Step 3.1
Make sure that the command mode is not enabled (the jumper is removed, the SVC/CMD wire is pulled to ground - as shown in the diagram in Fig. 2)
Step 3.2
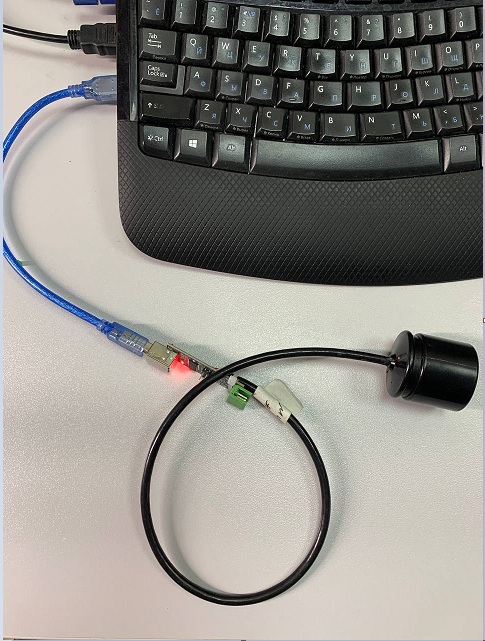
Connect the modem to the PC USB port using the converter:
 |
|---|
| Figure 4. The modem is connected to the PC |
Step 4
Enable the Command mode by default setting.
Step 4.1
Launch the uWave Host application
Step 4.2
Press the SETTINGS button on the top toolbar.
Step 4.3
In the settings window that opens, select the required port and press the OK button.
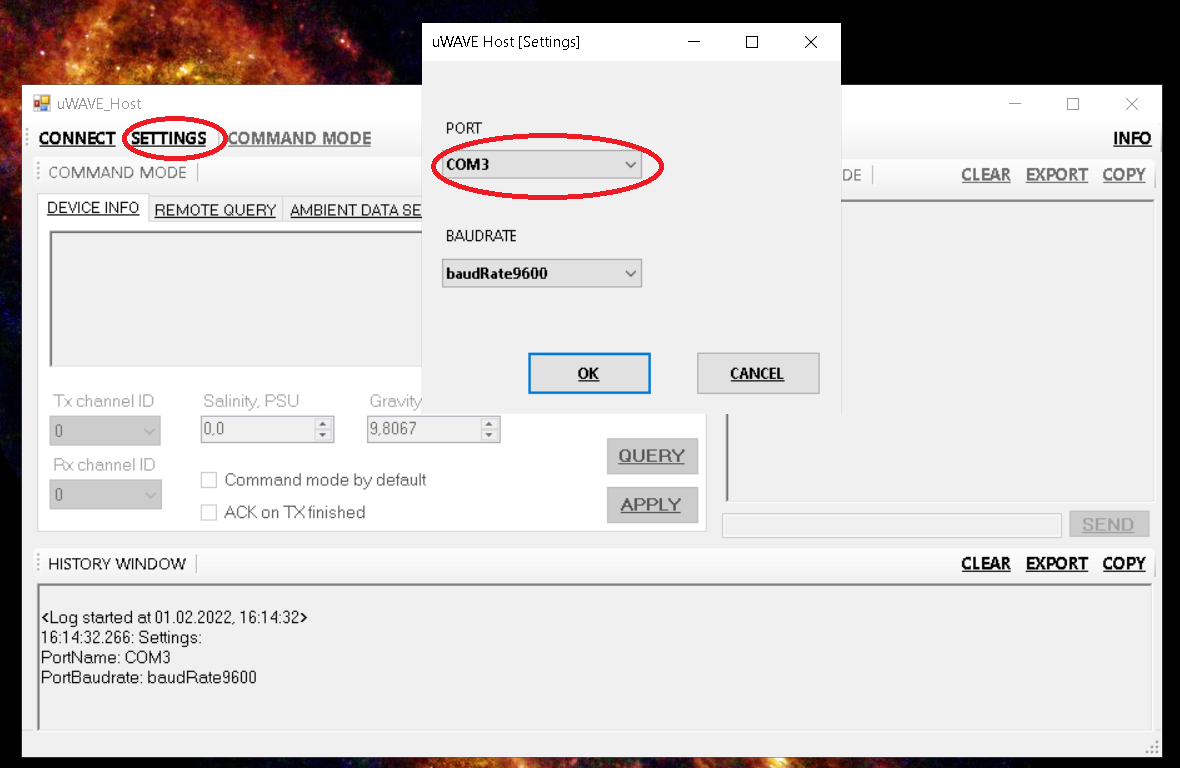 |
|---|
| Figure 5. Selecting the port |
Step 4.4
The application will prompt you to restart it to apply the new settings - confirm by pressing the OK button.
Step 4.5
After the application restarts, press the CONNECT button. If the application has successfully opened the port, the CONNECT button will become highlighted and change its name to DISCONNECT, and a corresponding message will be displayed in the HISTORY WINDOW text box.
If any error occurs, make sure that the port has been selected correctly and, if necessary, return to Step 4.2.
Step 4.6
Press the COMMAND MODE button, thereby informing the application that you are going to work with the modem in command mode.
Step 4.7
Put the modem into command mode by pulling the SVC/CMD wire up to 3.3 or 5 V.
Step 4.8
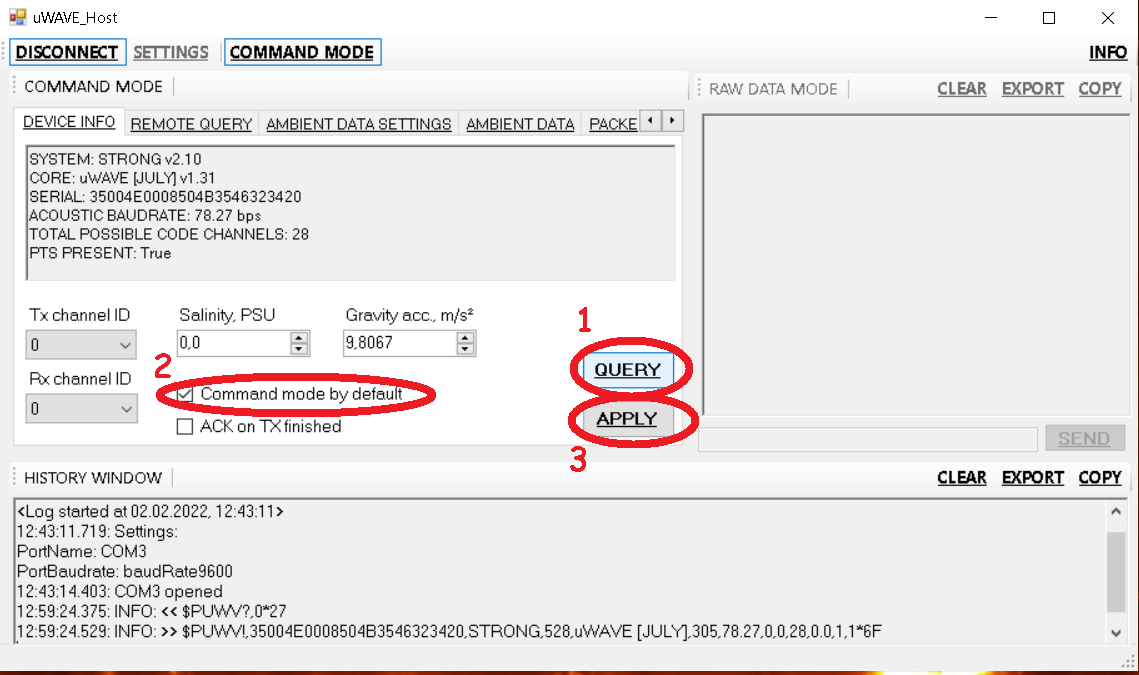
Press the QUERY button on the DEVICE INFO tab. If everything is done correctly, the corresponding information will be displayed in the HISTORY WINDOW and in the text field on the DEVICE INFO tab, for example, as in Figure 6.
 |
|---|
| Figure 6. Reading the settings and setting the command mode by default |
Make sure that the Command mode by default checkbox is checked. If it is not, check it and press the APPLY button to change the modem settings.
If this does not happen, close the port by pressing the DISCONNECT button and go to Step 4.2. If the port is selected correctly after all, make sure that the SVC/CMD wire was pulled to “ground” at the moment power was applied to the modem, i.e. go to Step 3.
Step 4.9
Close the uWave Host application
Step 4.10
Pull the SVC/CMD wire to “ground”.
Step 5
Updating the device firmware
Step 5.1
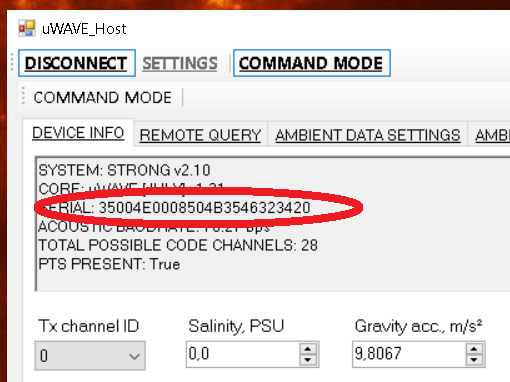
If you do not have a firmware file for this modem, contact technical support to obtain the firmware file. In the e-mail, state the serial number of the device:
 |
|---|
| Figure 7. Serial number of the device in the DEVICE INFO window |
Step 5.2
Launch the UCNL_FW_Update utility.
Step 5.3
Connect the modem to the PC via the interface converter, as shown in Step 3, making sure before connecting that the SVC/CMD wire is pulled to “ground”.
Step 5.4
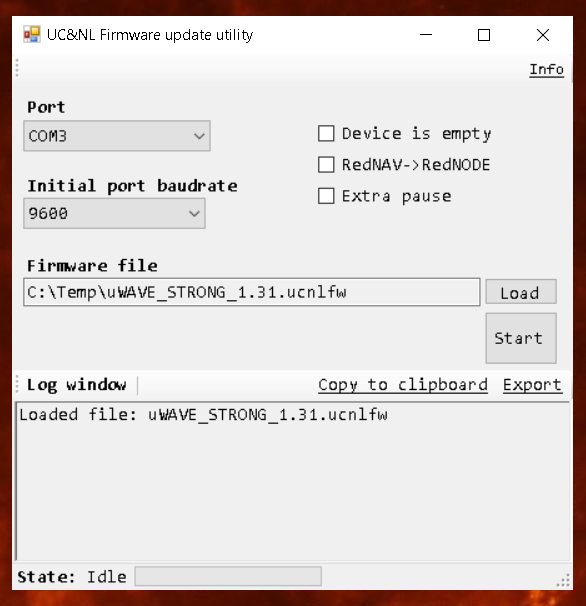
In the Port drop-down list, select the port corresponding to the device.
Step 5.5
Select the firmware file corresponding to the device by pressing the Load button. The remaining controls of the utility interface should look as in Figure 8:
 |
|---|
| Figure 8. Preparing the UCNL_FW_Update utility for reflashing the uWave modem |
Step 5.6
Start the firmware update process by pressing the Start button.
If:
- the port is selected correctly
- the state of the interface elements before the start corresponded to Figure 8
- the firmware file corresponds to the serial number of the device
- before power was applied to the device, the SVC/CMD wire was pulled to ground
Then the progress of the firmware update will start to be displayed in the bottom text field, as shown in Figures 9–11.
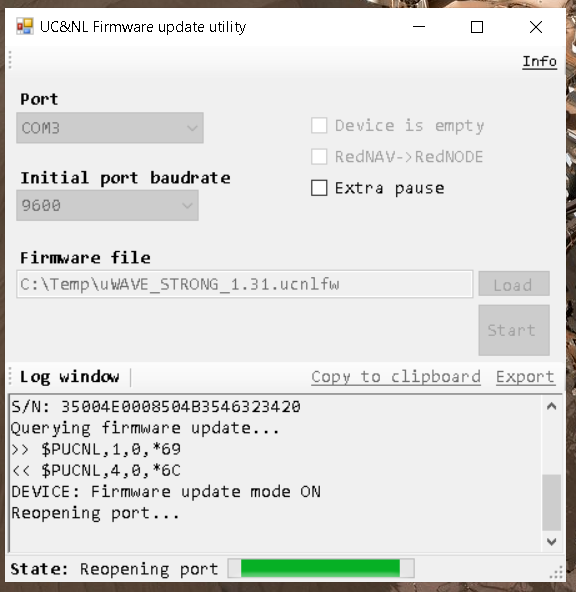 |
|---|
| Figure 9. Start of the firmware update |
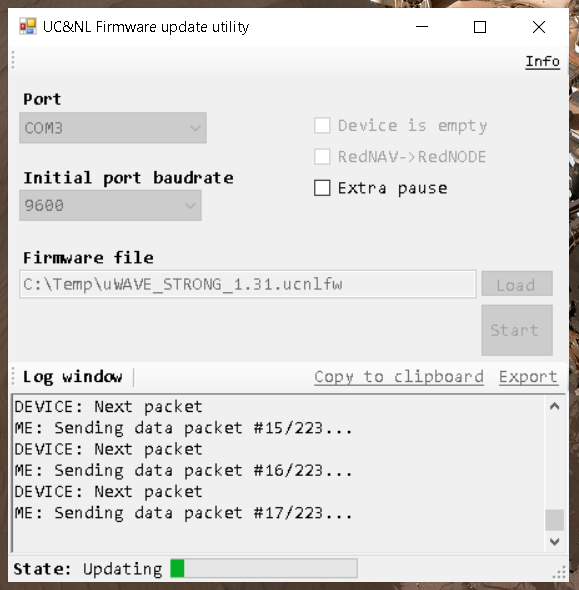 |
|---|
| Figure 10. Uploading the update to the device |
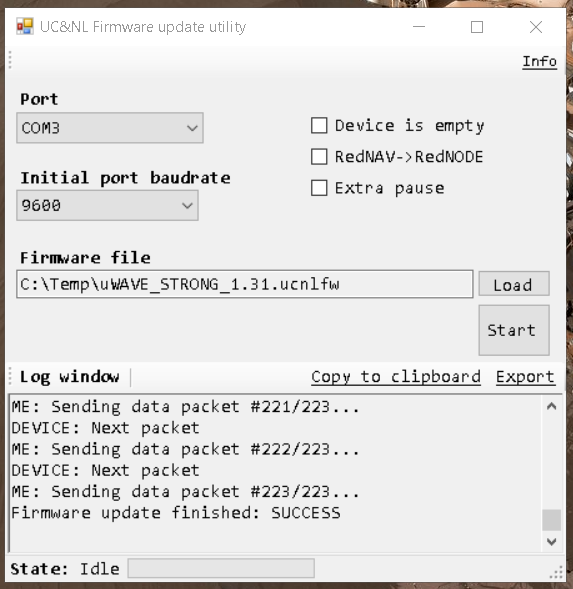 |
|---|
| Figure 11. Firmware update completed successfully |
Step 5.7
Close the application and disconnect the modem from the PC. The update is complete.
If the device firmware update cannot be performed, check the following possible causes:
- the port was selected incorrectly
- the state of the interface elements before the start did not correspond to Figure 8
- the firmware file does not correspond to the serial number of the device
- before power was applied to the device, the SVC/CMD wire was not pulled to ground
- the connection was interrupted during the firmware update
If the update cannot be performed, contact technical support.